Managing Feedback
Learn how to effectively manage bug reports, engage with your community, and handle releases.
Working with Bug Reports
You will be notified of each bug reported by users depending on your settings. You will always see a notification on the site, and may receive notifications via Discord bot and email.
AI-Powered Bug Processing
Depending on your AI submission verification level settings, artificial intelligence will:
- Make sure the submission is detailed enough
- Ensure it covers only one bug
- Check for duplicates in the system
- Assign appropriate tags and priority
You can customize these settings in Settings → General under Bug Description Validation Level:
- Strict AI Check - AI validates description and blocks submission if validation fails
- Loose AI Check - AI evaluates and shows a warning if issues are detected, but allows submission
- Minimum Character Limit - Ensures descriptions meet a minimum length (50 characters by default, customizable per project)
- No Check - Omits validation entirely
Managing Individual Bug Reports
For each bug report, you can:
- Delete the submission
- Change status (Open, In Progress, Resolved, Closed, Won’t Fix, Needs More Info)
- Start discussions in the comments section
- Ask for more information from the reporter
Requesting Additional Information
BetaHub makes it easy to request more details from testers. For any bug report element (steps to reproduce, screenshots, videos, logs), you’ll see an Ask for [Something] button.
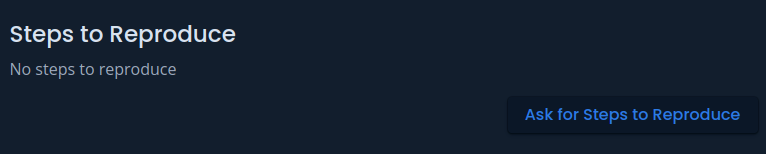
Clicking this button will cause BetaHub to contact the reporter (often via Discord bot) and request specific additions to the report.
Bug Report Lifecycle
When a bug is submitted, it’s first created in a Hidden state (draft). Once published, it becomes Open and visible to the team. If AI detects a duplicate, the status automatically changes to Duplicate. In BetaHub, duplicates are positive! Each duplicate elevates the original bug report’s heat, increasing its priority for resolution.
Common Status Flow:
- Open - Just reported and visible
- In Progress - Being worked on
- Resolved - Fixed and ready for testing
- Closed - Verified as fixed
Additional Statuses:
- Duplicate - Identified as duplicate of another issue
- Won’t Fix - Issue determined to not require fixing
- Needs More Info - Awaiting additional information from reporter
- Pending Moderation - Awaiting AI or manual review
- Hidden - Draft state, not yet published
See Quick Reference for all statuses, or configure custom statuses to match your workflow.
Community Engagement
Private Comments
When discussing bugs or tickets with your team, you may want to leave internal notes that testers shouldn’t see. Private comments let you do exactly that.
Who can see private comments:
| Viewer | Bugs & Media | Tickets |
|---|---|---|
| Developers | Yes | Yes |
| Organization Admins | Yes | Yes |
| The Reporter | Yes | Yes |
| Support Staff | No | Yes |
| Other Testers | No | No |
How to use private comments:
- When writing a comment, check the Private comment checkbox below the text field
- Private comments are visually distinct — they appear with a yellow background and a lock icon badge
- To toggle an existing comment’s visibility, click the lock/unlock icon on the comment
Smart defaults: If any private comment exists in the conversation, new comments default to private too. This changes back to public only when the reporter posts a public reply after the most recent private comment, so you don’t accidentally hide responses meant for them.
Notification behavior: Private comments still notify the people who can see them (developers, org admins, the reporter, and for tickets, support staff) via in-app notifications, email, and Discord DMs. However, they won’t appear in the public activity feed or in public Discord thread posts.
Private comments are available on bugs, tickets, and media attachments (screenshots, videos, log files). They are not available on suggestions, since suggestions are community-driven and meant to be fully public.
Developer-Private Media
Some attachments — like server logs, internal screenshots, or debug recordings — shouldn’t be visible to testers or the public. Developer-Private Media lets you mark any media attachment as developer-only during upload.
What happens when media is marked developer-private:
- Testers, support users, and public visitors won’t see it at all — not in the bug detail page, the JSON API, or the public bug board
- Developers and organization admins see all media, with a yellow lock badge indicating which items are private
- Individual media pages show an alert banner reminding you the file is restricted
Who can mark media as developer-private:
Anyone uploading media can set the flag. This includes game SDKs submitting server logs automatically — for example, Roblox server logs that players shouldn’t see.
How to set it:
When uploading via the API, include developer_private: true in the upload request. See the API documentation for the exact parameter format for each media type (screenshots, log files, video clips, binary files).
Developer-private media is a per-file setting, not a project-wide toggle. You can mix public and private media on the same bug report.
Visibility summary:
| Viewer | Regular media | Developer-private media |
|---|---|---|
| Developers | Visible | Visible (with badge) |
| Organization Admins | Visible | Visible (with badge) |
| Support staff | Visible | Hidden |
| Testers | Visible | Hidden |
| Public visitors | Visible | Hidden |
Communication Best Practices
- Respond promptly to bug reports to keep testers engaged
- Provide updates on bug status to maintain transparency
- Thank contributors for detailed reports
- Use the commenting system for discussions
Managing Tester Expectations
- Set clear expectations about response times
- Explain your bug triage process
- Communicate release schedules
- Acknowledge valuable contributions
Release Management
Creating Releases
Releases are essential for:
- Associating bugs with specific versions
- Communicating updates to your community
- Tracking progress over time
To create a release:
- Go to your project page
- Click New Release
- Fill in release details:
- Label - Version identifier (e.g., “1.0-beta1”)
- Release Type - Regular, Major, or Hotfix (affects notification style)
- Description - What’s new (supports Markdown)
- Images - Screenshots or promotional images
- Platforms & Download Links - Select available platforms and optionally provide download URLs
- Choose Save Draft to prepare the release without notifying testers, or Publish Release to make it visible immediately
Release Statuses
Releases have three possible statuses:
| Status | Visibility | Use Case |
|---|---|---|
| Draft | Developers only | Prepare release notes before the build is ready |
| Published | Everyone | Active releases visible to testers |
| Archived | Hidden from selection | Old versions you want to keep but hide from dropdowns |
Draft Releases
Draft releases let you prepare announcements before your build is ready:
- Only developers can see drafts — testers won’t see them on the releases page or receive notifications
- No notifications sent — Discord announcements and emails are only sent when you publish
- Coordinate with your team — share drafts internally before going live
When creating a new release, click Save Draft instead of Publish Release to save it as a draft.
If all your releases are drafts, you’ll see a warning banner reminding you that testers can’t see any releases yet.
Publishing Releases
To publish a draft release:
- Go to your project’s Releases page
- Click the Drafts filter to show draft releases
- Find your draft and click Publish in the actions column
- Confirm when prompted
When you publish:
- The release becomes visible to all project members
- Email notifications are sent to subscribers
- Discord announcements are posted (if integrated)
- Images are shared according to your settings
You can edit releases after publishing. Discord messages will automatically update to reflect changes.
Archiving Releases
Archive old releases to keep your release selector clean:
- Archived releases are hidden from dropdowns — when testers submit bugs and select a release, archived versions won’t appear
- History is preserved — archived releases still exist and can be viewed by developers
- Restore anytime — bring back archived releases if needed
To archive a release, click Archive in the actions column. To restore, use the Archived filter and click Restore.
You cannot archive your only published release. Projects must always have at least one published release visible to testers.
Viewing Drafts and Archived Releases
Developers see filter buttons at the top of the releases page:
- Draft — Toggle to show/hide draft releases
- Archived — Toggle to show/hide archived releases
These filters are only visible to developers. Testers only see published releases.
Advanced Management Features
Duplicate Detection
BetaHub’s AI automatically identifies potential duplicates. When duplicates are found:
- The new report is marked as duplicate
- The original report’s heat increases
- You can mark reports as duplicates or unlink them as needed
Regressions
When a new bug matches an issue that has already been Closed (fix verified in production), the system treats it as a regression rather than a duplicate. The new bug is created as a standalone issue with a link back to the closed one, so your team can investigate whether the fix has broken.
By default, bugs matching a Resolved issue are merged as duplicates. If your workflow treats “resolved” as fully fixed, you can enable Resolved Issues in Duplicate Detection in your project settings to treat those matches as regressions too.
Similar Bugs
When viewing a bug, the Similar Bugs card shows other bugs that may be related based on title and description similarity. Each entry displays the bug ID, title, and current status. This helps you find related issues before deciding whether to mark something as a duplicate.
The same feature exists for Suggestions as Similar Suggestions.
Merge Review Queue
The Merge Review Queue helps you audit the duplicate detection system’s decisions. It surfaces two types of reports that need human attention:
- Auto-merged reports near the threshold — bugs that were merged as duplicates, but the AI’s confidence was low. These might be incorrectly merged (different bugs that sound similar).
- Near-misses — bugs that scored just below the merge threshold. These might be duplicates the system missed.
Reports are sorted by how close they were to the decision boundary, so the most ambiguous cases appear first.
Enabling the Queue
The Merge Review Queue is an experimental feature. To enable it:
- Go to Settings → Experimental Features
- Check Merge Review Queue
- Save your settings
Once enabled, a Merge Review link appears in the project sidebar (visible to project developers and admins). Organization admins can also access the page directly.
Using the Queue
Each entry in the queue shows:
- The report title and a label indicating whether it was merged or not merged, and how close it was to the threshold
- The matched bug it was compared against, with a link to both reports
- The matched bug’s current status (open, in progress, resolved, etc.)
Click any entry to expand it and see:
- Side-by-side descriptions — the report on the left, the matched bug on the right, so you can quickly tell if they’re the same issue
- Screenshots from both reports — visual evidence to compare
- Steps to reproduce — if the reporter provided them
- Action buttons — depending on the situation
Available Actions
For merged reports (the system merged them as duplicates):
- Confirm Merge — the AI got it right, this is a genuine duplicate
- Unmerge — the AI got it wrong, split this back into a standalone bug
For not-merged reports (near-misses the system didn’t merge):
- Merge — the system should have merged this, do it now
- Dismiss — this is correctly not merged, remove it from the queue
All actions can be undone. If you change your mind, expand the entry and click Undo.
Filtering the Queue
Use the filter bar at the top to narrow down what you see:
- Period — today, last 7 days (default), last 30 days, or all time
- Outcome — show only merged reports, only not-merged reports, or both
- Review — show undecided entries (default), decided entries, or all
You can also search by report title or description using the search box.
The queue is available at the direct URL even without the experimental feature enabled — the toggle only controls the sidebar link visibility. Merge review entries are always created in the background regardless of the setting.
Understanding Heat
Heat is a dynamic score that helps you identify which bugs are most important to your community right now. While priority tells you how severe a bug is, heat tells you which bugs your users are actively experiencing and care about most.
Why Heat Exists
When you have dozens of “critical” bugs, how do you decide which to fix first? Priority alone can’t answer this question. Heat solves this by combining multiple signals that indicate real-world impact and urgency.
What Influences Heat
Heat is calculated from four factors:
- Duplicates - More duplicate reports indicate the issue is widespread. Each time a user reports the same bug, heat increases.
- Watchers - When users watch an issue, it signals the bug resonates with the community. Bugs with many watchers naturally rise in visibility, ensuring issues that matter most to your players get the attention they deserve.
- Recency - Recently reported bugs get a heat boost that decays over time. A bug reported today has more heat than one reported a month ago.
- Priority - Higher priority issues (critical, blocker) receive a heat multiplier, while lower priorities are dampened.
How to Use Heat
Heat appears as a sortable column in your issues list. Use it to:
- Sort by heat to find bugs that need immediate attention
- Compare similar-priority bugs - when you have multiple critical bugs, heat shows which one affects more users
- Track trending issues - a bug gaining heat indicates growing user impact
- Balance your backlog - heat helps ensure you’re not ignoring frequently-reported issues in favor of technically-severe but rare ones
Heat vs Priority
| Aspect | Priority | Heat |
|---|---|---|
| Set by | AI or developer | Calculated automatically |
| Measures | Technical severity | Community impact & urgency |
| Changes | Manually updated | Dynamic, updates continuously |
| Use case | Initial triage | Ongoing prioritization |
Example Scenario
Two critical bugs exist:
- Bug A: Causes crash during tutorial (5 duplicates, 8 watchers, reported today)
- Bug B: Causes crash in endgame content (1 duplicate, 2 watchers, reported 3 weeks ago)
Both are critical priority, but Bug A has much higher heat because more users are hitting it, more people are watching it, and it was reported recently. Heat suggests Bug A should be fixed first.
Heat updates automatically as users report duplicates and watch issues. You don’t need to manage it manually—just use it as a sorting and prioritization tool.
Quick Assign from Issues Table
You can assign bugs to team members directly from the issues table without opening each report individually. Click the three-dots menu (…) on any issue row and select Assign to… to see a list of all project developers, complete with avatars for easy identification.
Select a developer to assign the issue, or choose Unassigned to remove the current assignment. The table updates automatically after the change.
Bulk Operations
For managing multiple reports:
- Filter by status, priority, or tags
- Perform bulk status changes
- Export reports for external analysis
Analytics and Insights
Monitor your project’s health through:
- Bug report trends
- Tester engagement metrics
- Release feedback patterns
- Community sentiment analysis
Activity Feed
Keep track of your project’s progress with BetaHub’s activity feed, which provides a simple chronological log of important project actions:
- Team Activity Log - See when team members create issues, make comments, or change statuses
- Issue History - Track the lifecycle of individual bug reports and feature requests
- Release Activities - Monitor when new releases are created
- System Actions - View Discord bot activities and automated notifications
The activity feed helps you:
- Stay informed about recent project changes
- Review team member contributions
- Track the progress of individual issues
- Maintain basic project visibility
Note: Activity feeds are only visible to project developers and support staff.
Learn more about the Activity Feed in our advanced features guide.
Integration with External Tools
Send bug reports to your preferred project management tools:
- From List View: Click three-dots menu (…) → Send to…
- From Detail View: Click three-dots menu in report → Send to…
Supported integrations include Jira (Cloud and Server), Asana, GitHub, Notion, Monday.com, ClickUp, Fibery, and Redmine.
Best Practices
Bug Report Management
- Triage regularly - Review new reports daily
- Prioritize effectively - Use BetaHub’s priority system
- Communicate status - Keep reporters updated
- Document solutions - Add resolution notes
Community Building
- Engage positively - Thank contributors
- Be transparent - Share development progress
- Provide feedback - Let testers know their impact
- Recognize contributors - Highlight valuable testers
Process Optimization
- Review regularly - Assess your workflow efficiency
- Automate where possible - Use integrations, AI features, and Automation Rules to automatically follow up on missing attachments
- Gather feedback - Ask testers about their experience
- Iterate and improve - Refine your process over time
Getting Help
If you need assistance with managing feedback:
- Join our Discord server for community support
- Check the FAQ for common questions
- Contact support for technical issues
See Also
- Core Features – Feedback management essentials
- Discord Bot – Community feedback via Discord
- Submitting Feedback – How testers report bugs
- Advanced Features – Webhooks, API, and automation
- Public Bug Board – Share bugs publicly with your community